Not all storm panels have a hurricane shutter track system. In fact, many panels are installed without one. Unfortunately, many instructions available on the internet are specific to installing panels with a track system. So you may be curious how to install your panels on your Fort Myers, Cape Coral or Southwest Florida house correctly if you do not have a track system. Well, this guide is for you. We give step-by-step instructions for how to install your hurricane shutters without tracks.
Are you looking for installation instructions for panels WITH a track system? Read our instructions here: Storm Shutter Installation: How to Put Up Hurricane Shutters
Table of Contents
PRECAUTIONS AND NOTES BEFORE STARTING
It is important to keep the following things in mind before starting.
SAFETY FIRST
Take the following safety precautions in mind:
- Wear protective gear: it is very important to wear protective gloves, protective eye wear, and other proper protective gear when handling your hurricane panels.
- Storm panels have SHARP corners and edges. In turn, wear protective gear and use extreme care when handling them at all times.
- Eurex Shutters PTX™ Storm Panels (like others) are treated with a protective oil coating and may cause allergic reactions.
- Protect your eyes and body at all times.
- Know your limits and get help: storm panels, especially metal shutters (and to a lesser degree aluminum shutters) are heavy.
- Practice ladder safety: two story homes will require proper ladders and equipment. Ensure that you have adequate ladders, know how to properly use them and feel comfortable using them.
PRACTICE AND BE PREPARED
If you have never installed hurricane panels before we recommend you practice before a storm approaches. Specifically, practice installing all panels before hurricane season starts to familiarize yourself with the installation process. This goes for all hurricane shutters.
It is very helpful to create a list of where each of the panels go and mark the panels accordingly. This will make your job of sorting them out and installing them much easier.
INSTALL YOUR PANELS EARLY
When it comes to installing your storm panels procrastination is not a good idea.
You should do your shutter installation as early as possible when a storm is approaching. Depending on your home and physical capabilities, it may take you 1 or 2 days to install your panels. Make sure you have plenty of time before the storm hits.
Make sure to read our guide on when to put hurricane shutters up to learn how far in advance to install your panels.
HAVE YOUR HURRICANE SHUTTER HARDWARE READY
Make sure you have all your necessary shutter fasteners and hurricane shutter hardware ready. This is extra important if your panels do not have tracks. You will want to make sure you have the fasteners handy to reduce the burden of attaching your panels to your house. This will make your installation much easier and faster.
IF YOU DON’T WANT TO INSTALL YOUR PANELS YOURSELF
Installation and removal should be done by an able-body adult. If you do not have the time, ability or desire to do the installation you should consider hiring someone to install your hurricane panels instead. In fact, we recommend that you use the services of a competent contractor.
Lastly, it is important to have someone ready before a storm hits. Contractors who install panels will usually be overloaded when a storm is approaching. Trying to find someone might be stressful at best and impossible at worst.
LOOKING FOR HURRICANE INSTALLATION NEAR YOU?
There are several hurricane shutter installation services that offer installation of your hurricane shutters in Fort Myers, Cape Coral, Napes and throughout the Southwest Florida area. You can look for a service that specializes in this or even a handyman service.
Installing panels without a track

Below we give step-by-step instructions for how to install your panels without a track. These directions assume that you already have the proper fasteners (bolts and/or anchors) installed into the exterior of your home. If you do not, you will need to install them properly in order to install your panels securely.
Also, these instructions are meant for Eurex Shutters brand storm panels. However, they can also be used as a general guide for other brands of corrugated aluminum, metal, and plastic panels as well.
Step 1: Sort and situate your panels for each opening (window or door)
Before beginning you will want to sort your storm panels. Determine which opening each individual panel goes to and place the panels next to their corresponding opening. This will make it easier to install each panel and move through the entire installation. It will also eliminate mistakes and the need to go back and switch panels around later if they are not correct.
It is important to focus on one window (or door) at a time. This will keep everything organized. Finish one window/door and move to the next.
Step 2: remove fasteners for your first window or door
If your fasteners are already installed your first step will be to uninstall the fasteners and keep them in a safe, easy to access location. You will want to be able to place each panel over the fastener holes, grab the fasteners and fasten them easily. This is easier than holding the panel while trying to remove each fastener.
You storm panels may have a variety of fastener systems. For example, you may have anchors and sidewalk bolts, bolts with wing nuts, or another type of anchoring system. Regardless, you will want to remove the fastener before placing your panel on your house. It should be noted just to remove the fastener itself and not the anchor in the wall.
Step 3: Place your first panel and secure it with fasteners

You want to start at the outside of your window or door, regardless of if you are installing your panels horizontally or vertically. In other words, start on the outside and work over (or up). Do not start in the middle of a window/door.
Place your first panel so that the holes on the panel line up with the outer-most fasteners (bolt or anchors) on your exterior wall. Secure the outer-most fasteners (insert and turn sidewalk bolts, or place your wingnut over your studs and turn). But do not tighten the fasteners all the way. This will allow you to adjust the panels as necessary.
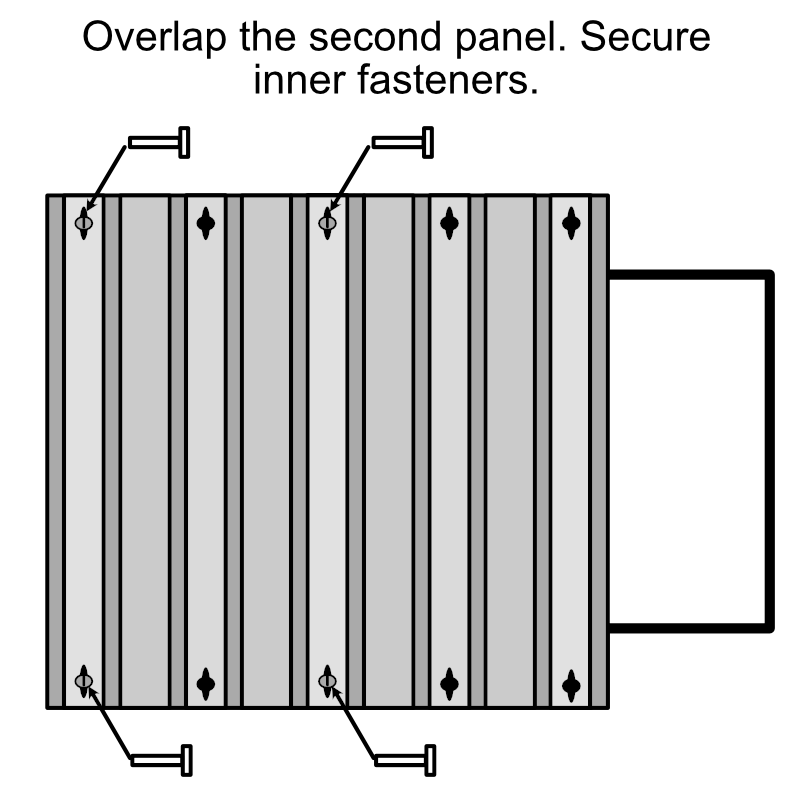
Important: do not put all the fasteners on. You should only attach the outer-most fasteners. This is because your storm panels are made to overlap each other. In turn, you will need to overlap the next panel before attaching the next fastener.
Step 4: repeat step 3 for each of the individual panels, overlapping panels, until each window/door is fully covered

Your storm panels are made to overlap each other. The first hole of your second panel will overlap the last hole of the first panel you installed. The first hole of your third panel will overlap the last hole of the second panel you installed, and so forth.

As mentioned above, secure each fastener loosely (not fully tight), allowing for adjustment as necessary.
Step 5: go back and secure all fasteners
Once your opening is fully covered (all panels are in place and covering the window/door) you will go back and fully tighten all the fasteners. You should this with a drill or hand tool with the proper bit (ie. wing nut driver, or appropriate screw bit). Make sure to tighten the securely without over-tightening them.
Or call (239) 369-8600 for immediate service.


